
Dear MySQL users, MaxDB users and friends,
this is the fourth posting in our MaxDB series. The series started about four weeks ago and it will very likely take the rest of the year to complete. All postings of the series together will make kind of an online course for MaxDB. Over the last postings we explained what MaxDB is, we explained about the outstanding features of MaxDB and we taught you how to perform a basic MaxDB installation that serves as a basis for all of the following lessons.
In this issue
The today’s MaxDB lesson is about the two most important tools of MaxDB. The first tool is the Database Manager GUI and it’s commandline counterpart dbmcli. The Database Manager GUI is the main tool to perform administrative tasks like shutting down the database, performing backups or doing some basic monitoring of the health status of your MaxDB database instances.
- The Database Manager
- System Architecture
- DBMCLI Usage Example
- The Database Manager GUI
- Remote connections: ensure the X Server runs and no firewall blocks communication
- The SQL Tools
- Learning DBM command using the Reverse Engineering trick
- Using SQL Studio
- Pitfalls, error messages and searchable manual variants
- Summary
- In the next issue
The lesson will not discuss the Database Analyzer. The Database Analyzer is used for performance bottleneck-analysis. We described the tool in the DevZone article MaxDB performance tuning primer and we will get back to in a future posting. We also do not describe the Loader (Im-/Export tool) or any of the database utilities ( Event Dispatcher, XCONS, XUSER, X Server) today. But again, you can be sure we will discuss them later. For today the lesson is on the two most important tools for you to start with MaxDB.
Most of the components have their own logfile that you can check for errors. The logfile of X Server is named xserver_<computer_name>.prt.
The Database Manager
MySQL users that try out MaxDB for the first time will be faced with a new term: database instance. You can compare a database instance roughly to a MySQL Server software installation with several databases. A MaxDB database instance is a copy of the version dependent software components of MaxDB – mainly the kernel and some interface libraries – together with the data and log files. In other, simplified words: a MaxDB database instance is a copy of the database kernel plus the database files managed by the software. The database instance can be devided on the SQL level into SQL schemata. One schemata inside a MaxDB database instance can be compared to one logical MySQL database. Remember that CREATE SCHEMA is a synonym for CREATE DATABASE as of MySQL 5.0.2.
Administrative actions are performed under MySQL partly using SQL-like commands, partly using tools, partly by modifying the server configuration file. MaxDB tries to use one unified tool for all administrative tasks. Although you’ll find also SQL-like commands and tools in addition to the Database Manager in MaxDB the Database Manager remains the main and central component to perform administrative tasks.
System Architecture
Before we explain how to use the Database Manager, you need to learn some basics about the system architecture. The background knowlegde of how the individual parts of the database work together helps you to get the big picture and to develop a deeper understanding of the technology. This in turn helps you to analyze and debug problems on your own.
| Database Manager (DBM) | |
|---|---|
| Clients | Server |
| Database Manager GUI (DBMGUI): graphical user interface | Database Manager Server (DBM Server) |
| Database Manager CLI (DBMCLI): command line interface | |
| Database Manager RFC (DBMRFC): interface to the SAP system; only in SAP systems | |
The Database Manager (DBM) is a server – client application. Client and server part together are called the Database Manager. The Database Manager GUI (DBM GUI) and the Database Manager CLI (DBMCLI) are two clients of the Database Manager Server (DBM Server). Having both a GUI and a CLI client is an advantage. You can use call the CLI tool DBMCLI from within your own administration scripts. Scripts can help you to automate standard tasks and ensure that things are always done in the same, documented way. The GUI interface is handy for beginners but also experts will profit from the built-in, easy to use wizards of the DBM GUI.
The Database Manager server receives commands from the clients and talks to the kernel in order to execute the commands. If the DBM client and the DBM server are on the same host, then the DBM client can connect directly to the DBM server. If the DBM client runs on a different host than the DBM server, then the X Server remote communication component (default port: 7210) will be connected from the DBM client to forward the request to the DBM server.
| Local communication | |||
|---|---|---|---|
| DBM Client -> | DBM Server -> | Kernel | |
| Remote communication | |||
| DBM Client -> | X Server -> | DBM Server -> | Kernel |
What does this mean for you, why should you know? For example, you might want to know which components connect to each other, if your DBM GUI does not work as expected and reports communication error. If your DBM GUI connects to a remote DBM Server, if it connects to a remote database instance, then check all the components on the way. Ensure that the X Server is running (see below), check if you can establish a local DBM Server connection using a locally installed DBMCLI and check if the kernel is running.
Most of the components have their own logfile. You can check the logfiles for error messages to debug the chain of communication. The X Server protocol is named xserver_<computer_name> and is located in the directory <independent_data_path>/wrk/. The Independent Data directory (<independent_data_path>) contains data, configuration and run directories of database instances and applications that are version independent. The counterpart to the Independent Data directory is the Dependent Path (<dependent_path>). As you might expect, you will find version-dependent server software in the Dependent Path. All programs in these version-dependent directories are not executed directly by the user, but are called using the programs stored in the <independent_program_path> (See also MaxDB Glossary: Database Directory).
DBMCLI Usage Example
Stay tuned, the lengthy explanations on the hardware footprint of MaxDB do not only explain how to debug your setup, but also lead us directly to the first usage example of the DBMCLI, the text-based command line DBM client. The DBMCLI is located in the installation path (<inst_path>) of the database. If you did not change the default settings for locations during the MaxDB installation as we advised in our last article, the default location is /opt/sdb on Unix and C:\Program Files\sdb . Call the DBMCLI and check the help output.
$ /opt/sdb/programs/bin/dbmcli --help
usage: dbmcli [<options>] [[-c] <dbmserver -Command>]
    <options>:
        -u    username,passwd   (DBM user)
        -U    [userkey]         (default DBMUSR)
        -uUTL [username,passwd] (UTILITY session)
        -uSQL [username,passwd] (SQL session)
        -uSRV                   (Service session)
        -V                      (show version of server)
        -d    dbname            (set dbname)
        -R    dbroot            (set dbroot)
        -n    node              (name of servernode)
        -e    encryption        (encryption method)
                                (use only with -n)
                                (valid methods: 'SSL')
        -i    inputfile         (Default stdin)
        -ic   inputfile         (Default stdin)
        -o    outputfile        (Default stdout)
        -t    protocolfile      (writes subsequent protocol)
        -s                      (local mode, don't use with -n)
        -key                    (wait for any key on exit)
    <DBMServer-Command>:
        Everything after the options will be sent to DBMServer.
        For more information about the DBMServer-Commands use
        the DBMServer-Command help.
Connect to the MAXDB1 database instance that was created during the last lesson. Again, if you did not overrule any of the default settings as we suggested, you can use the user DBADMIN with the password DBADMIN to establish the connection of the DBMCLI client to the DBM server. Specify the username and password using the option -u. Use the option -d to specify the name of the database instance you want to connect to. If the database instance does not run on the same host as the DBMCLI tool, use -n to specify the hostname of the database instance.
$ /opt/sdb/programs/bin/dbmcli -u DBADMIN,DBADMIN -d MAXDB1
dbmcli on MAXDB1> help
nixnutz@linux:~> /opt/sdb/programs/bin/dbmcli -u DBADMIN,DBADMIN -d TEST
/opt/sdb/programs/bin/dbmcli on TEST>help
OK
apropos                  <command_name_part>
[...]
user_response            <response>

version

---
dbmcli on MAXDB1> file_getlist
OK
keyname,mode,size,date,time,comment,filename
KNLDIAG ASCII   58646   20060228        181543          Database Messages       knldiag.classic
[...]
ANALYZER        DIRECTORY       48      20051003        184601          DB Analyzer File        analyzer
Use the command “help” to display a list of all DBM commands and try “file_getlist” to get a list of all database files including the configuration and protocol files that belong to the database instance MAXDB1 to which you are connected. As you can see the X Server protocol file is not listed, because the X Server is a version independent tool that does not belong to one database instance. However, we explained that the X Server protocol file is located in <independent_data_path>/wrk/. Use the DBM command “dbm_getpath” find out the setting for <independent_data_path> and check if you can find the X Server protocol file in that location.
dbmcli on TEST>help dbm_getpath
OK
dbm_getpath              [IndepDataPath|IndepProgPath]

---
dbmcli on TEST>help dbm_getpath IndepDataPath
OK
/var/opt/sdb/data

---
dbmcli on TEST> quit
$ ls -la /var/opt/sdb/data/wrk/xserver*
-rw-rw-rw-  1 sdb sdba   506 2006-02-28 17:27 /var/opt/sdb/data/wrk/xserver_linux.nitrace
-rw-r-----  1 sdb sdba 65536 2006-02-28 17:27 /var/opt/sdb/data/wrk/xserver_linux.prt
A list of all DBM commands is contained in the manual. As usual the easiest way to find the list is to use the Glossary: DBM Command. Later in the course, we will give examples how to perform typical administrative tasks like backup and recovery using the DBMCLI. For now, please consult the manual.
Back to the debug example. Of course the DBM server does also have a Database Manager Protocol (DBMPRT). The DBMPRT is located in <independent_data_path>/wrk/<database_name>/dbm.prt . The Database Manager Protocol is not only a great source of information when you debug connection problems. The support will ask you frequently for it to learn which administrative tasks have been executed. And – listen – you can use the DBMPRT to reverse engineer actions that have been performed in the DBM GUI. This is very handy as often you do not need only to know which DBM command to execute but also in which context and order to execute it.
 $ ls -la /var/opt/sdb/data/wrk/MAXDB1/dbm.prt
-rw-rw----  1 sdb sdba 13634 2006-02-28 18:26 /var/opt/sdb/data/wrk/MAXDB1/dbm.prt
 $ tail /var/opt/sdb/data/wrk/MAXDB1/dbm.prt
[...]
2006-02-28 18:26:42 0x00001fa3 INF        226 DBMSrv   DBM Server client disconnect: PID 8098 on computer linux.site
The Database Manager GUI
Let’s try out this reverse engineering hint. Download and install the DBM GUI from http://dev.mysql.com/downloads/maxdb/7.6.00.html if you have not done this already. Note that the DBM GUI is not part of the server download. It comes as an extra download. The same is true for the SQL Client “SQL Studio”.
Both applications are currently only available on Windows. Future versions of MaxDB will be delivered with new client tools that are based on Java and thus can be run on all operating systems that have a GUI and are able to run Java, which is basically true for all operating systems that MaxDB supports. Up to and including version 7.5.00 there are web based counterparts of the Windows GUI tools (DBM GUI and SQL Studio). The development of the Web DBM, the Web Server and the Web Server Manager has been discontinued. Open Source customers can try to install the 7.5.00 versions of the tool with 7.6.00 server. Commercial customers can consult the support team for more information.
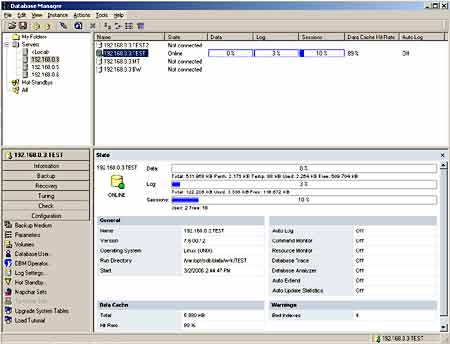
The Database Manager GUI (DBM GUI) can be used to administrate multiple database instances. Start the DBM GUI and register your database instance “MAXDB1”. Make sure that the DBM GUI shows all of the four main screen areas. The four main screen areas are (clockwise from upper left to lower right): the directory structure of the database instances, the list of the database instances, the menu list of the current database instance and the output area. If your screen does not show these areas, use the “View” menu to reconfigure the software. Select “Database Instance… Add” in the output area to open a wizard to register your database instance “MAXDB1”. Alternatively you can use a right mouse click on “Servers” in the directory structure area (upper left) to invoke the wizard using the context menu.
Fill out the combo box “Database Server” of the wizard to specify the host on which your database instance “MAXDB1” runs. If the DBM GUI and the database instance are running on the same host, you do not need to alter the default value of <Local> for localhost/127.0.0.1 . If you want to connect to a remote host, specify the server name or the IP of the remote host, e.g. 192.168.0.2 . Click on “Add” to display a list of all MaxDB database instances running on the specified host, select the database you want to register at the DBM GUI and click OK.
Remote connections: ensure the X Server runs and no firewall blocks communication
Remember that for all remote communication the X Server is used! The X Server must be running. On Windows the X Server has been installed as a service and will be started automatically. On Unix you must start the X Server manually (see below). By default the X Server is using port 7210 (TCP/IP). Make sure your firewall does not block this port. One way to configure an alternative port is to use the option -S of the x_server program.
$ /opt/sdb/programs/bin/x_server -W -Y start
    12902  XSERVER  started, 'X32/LINUX 7.6.00   Build 012-121-102-632'
$ ps -ef | grep vserver
sdb       7747     1  0 12:41 pts/3    00:00:00 /opt/sdb/programs/pgm/vserver -W -Y start
root      7750  7739  0 12:41 pts/3    00:00:00 grep vserver
The “MAXDB1” database instance should now be visible in the Server list of the upper left screen area. Click on the host and select the database instance in the list of database instances. Connect to the database using the username DBADMIN and the password DBADMIN. As said above, we assume that you have not changed any of the default settings during the installation of the MaxDB softare in the last lesson. Be warned that the DBM GUI might remember the username and password you have specified to connect the DBM Client (the DBM GUI) to the DBM Server if you have choosed this option when connecting to an instance. You can change this behaviour using the application menu: View – Options – Authorization.
You just managed to do the most complicated task in the DBM GUI. The rest should be self-explanatory. Most of the actions that you can perform are “secured” by using wizards. The wizards will prevent you from configururing settings that do not make sense or they will at least bail at you in most cases. In other words: it is “safe to play” with the DBM GUI when you try it out for the first time.
Your first excercise is to start the “MAXDB1” database instance. Select the MAXDB1 database instance in the instance list and start it using Actions – Online. A MaxDB database instance can be set in one of four operational states: Offline, Admin, Online and Standy. Unless you are working with a MaxDB Hot Standby setup, you will not work with the Standby state. SQL clients can only connect to the database when it is in Online state. Some, few administrative tasks can only be performed in Admin state. Admin state means that all SQL clients are disconnected but the kernel is still running. Once you have switched to Online state, switch to Admin, Offline and Online again. Don’t ask why, just do it.
- Online: SQL users can connect, administrative commands can be executed
- Admin: only administrative tasks can be executed
- Offline: not running
Learning DBM command using the Reverse Engineering trick
At the beginning it has been shown that the DBM GUI is a client of the DBM Server and that the DBM Server writes a log file, a protocol file. The logfile is located in <independent_data_path>/wrk/<database_name>/dbm.prt . It has been made the statement that this protocol file is a great help to learn about DBM commands as it can be used to reverse engineer DBM GUI commands. Let’s check.
$ tail -n 20 /var/opt/sdb/data/wrk/MAXDB1/dbm.prt
2006-03-02 14:38:50 0x00001f9a INF        216 DBMSrv   DBM Server client connection established: PID 316 on computer 192.168.0.2
2006-03-02 14:38:50 0x00001f9a INF          0 DBM      command auto_extend show
2006-03-02 14:38:50 0x00001f9a INF          0 DBM      command auto_update_statistics show
2006-03-02 14:41:31 0x00001f9a INF          0 DBM      command db_online -f
2006-03-02 14:41:40 0x00001f9a INF          0 DBM      command db_execute SELECT ID,CREATEDATE,USEDSIZE
2006-03-02 14:41:40 0x00001f9a INF          0 DBM      command auto_extend show
2006-03-02 14:41:40 0x00001f9a INF          0 DBM      command auto_update_statistics show
2006-03-02 14:41:45 0x00001f9a INF          0 DBM      command db_admin -f
2006-03-02 14:41:53 0x00001f9a INF          0 DBM      command auto_extend show
2006-03-02 14:41:53 0x00001f9a INF          0 DBM      command auto_update_statistics show
2006-03-02 14:41:55 0x00001f9a INF          0 DBM      command db_offline
2006-03-02 14:41:56 0x00001f9a INF          0 DBM      command auto_extend show
2006-03-02 14:41:56 0x00001f9a INF          0 DBM      command auto_update_statistics show
2006-03-02 14:42:03 0x00001f9a INF          0 DBM      command db_online -f
2006-03-02 14:42:10 0x00001f9a INF          0 DBM      command db_execute SELECT ID,CREATEDATE,USEDSIZE
2006-03-02 14:42:10 0x00001f9a INF          0 DBM      command auto_extend show
2006-03-02 14:42:10 0x00001f9a INF          0 DBM      command auto_update_statistics show
The protocol file shows the commands that have been sent from the DBM GUI to the DBM server. It does not require expert knowledge see that commands db_online, db_admin and db_offline are used to alter the operational state of the database instance to Online, Admin and Offline. The commands auto_extend and auto_update_statistics are frequently called with the parameter show. Check the output area of the DBM GUI for the two columns Auto Extend and Auto Update Statistics. Again, it’s not difficult to do the reverse engineering and find out where the DBM GUI gets the information to show the On/Off status information. Check what you have learned using DBMCLI. Make sure you end up with the database instance beeing in Online operational state, otherwise you cannot connect with the SQL tools in the next step.
 $ /opt/sdb/programs/bin/dbmcli -u DBADMIN,DBADMIN -d MAXDB1
MAXDB1>auto_extend show
OK
OFF

---
MAXDB1>db_offline
OK

---
MAXDB1>help db_online
OK
db_online                [-f|-s|-t] [-u <yyyymmdd> <hhmmss>]

---
MAXDB1>apropos db_online
OK
db_online                [-f|-s|-t] [-u <yyyymmdd> <hhmmss>]

---
MAXDB1>db_online
OK

---
The SQL Tools
MaxDB comes with three different SQL tools, much like with the DBM tools. SQL Studio is an ODBC based GUI application available on Windows to issue SQL queries. SQLCLI is the text-based command line variant and Web SQL is the third variant. As explained above, you should try not to use Web SQL or any of the other Web tools. Some of them are already deprecated and it could happen that Web SQL will also be deprecated in future versions.
The SQLCLI binary can be found in the same directory as the DBMCLI program. SQLCLI can be invoked with the same options as DBMCLI. The major difference in use is the syntax for commands. SQLCLI is using backslash commands. In order to quit SQLCLI you do not write quit but \quit. We will not discuss any more details of SQLCLI. It is more convenient and comfortable to use SQL Studio or any other ODBC/JDBC based third-party GUI tool as your favourite SQL tool
$ /opt/sdb/programs/bin/sqlcli -h
SQLCLI version 7.6.0, the MaxDB interactive terminal.

Usage:
  sqlcli [<options>] ... [<command>]


Options for connecting to the database:
  -n <database_server>[:<port>] name of the host on which the database
                          instance is installed(default: localhost)
  -d <database_name>      name of the database instance
  -u <user_name,password> user name and password
  -U <user_key>           xuser key

  -S SQLMODE              SQL mode, possible values are
                          "INTERNAL","ORACLE","ANSI", or "DB2"
  -y                      sets session timeout in seconds (0 means no timeout)
  -z                      switches autocommit off
  -r                      suppress usage of prepared statements

Input and output options:
  -i <file_name>  use file <file_name> to input queries (default: stdin)
  -o <file_name>  use file <file_name> for output (default: stdout)
  -x              run quietly (no messages, only query output)
  -m              activates the multi-line mode for query input
  -c <separator>  use <separator> for separate commands read from
                  input files (default: '//')

Output format options:
  -F <separator>  use <separator> as the field separator (default: '|')
  -g <null_value> use <null_value> whenever a field is NULL (default: '?'
  -p <prefix>     use <prefix> as row prefix for printing (default: '|'
  -P <suffix>     use <suffix> as row suffix for printing (default: '|'
  -A              switch to unaligned output mode.
  -Q              show each column on a separate line
  -a              do not print any header for SELECT commands
  -f              printout the SQL commands
  -b MAXLENGTH    max. output length for long columns in
                  bytes/characters (default is 10)
General options:
  -h              show help, then exit
  -v              printout version information
  -E <exit code>  exit sqlcli returning <exit code> in case of an error
  -t              printout debug information
  -T <filename>   write a database interface trace (SQL trace)

For further information, type "\?" (for internal commands) from
within SQLCLI or consult the SQLCLI documentation.
$ /opt/sdb/programs/bin/sqlcli -u DBADMIN,DBADMIN -d TEST

Welcome to the MaxDB interactive terminal.

Type:  \h for help with commands
       \q to quit

sqlcli=> \h

 \? or \h[elp]  show help on internal slash commands
 \q[uit]        quit SQLCLI
 \c[onnect]     -n <database_server>[:<port>]
                -d <database_name>
                -u <user_name,password>
                connecting to the database
 \di[sconnect]  disconnecting from the database

 \a[utocommit]  [ON|OFF] switch autocommit mode on or off
 \m[ode]        [INTERNAL|ORACLE|ANSI|DB2] change SQL mode
 \ps            [ON|OFF] toggle the usage of prepared statements on or off
 \o[utput]      <filename> send all query results to file
 \i[nput]       <filename> read input from the file <filename>

 \p[rint]       print out the current query buffer
 \r[eset]       reset (clear) the query buffer
 \e[dit]        <filename>  edit the query buffer (or file) with external editor
 \g             send query buffer to server (and print out the results)

 \al[ign]       [ON|OFF] toggle the aligned output on or off
 \f[ieldsep]    <separator> use <separator> as the field separator
 \s[tatus]      print out host, database, user etc.
 \!<command>    execute <command> in shell

 \dc [PATTERN]  list columns
 \de [PATTERN]  list indices
 \dp [PATTERN]  list procedures
 \ds [NAME]     list schemas
 \dt [PATTERN]  list tables
 \du [NAME]     list users
 \dv [PATTERN]  list views
 [PATTERN] = [OWNER.][OBJECT NAME] eg. <username>.%A%
Using SQL Studio
If you have not installed SQL Studio yet, go to the MaxDB download page, download the software and install it now. Remember that SQL Studio comes as an extra download just like DBM GUI. Both tools are not included in the server package.
Using SQL Studio is quite easy and does not require words to explain. All that must be said are some words about common pitfalls and useful functions that are not obvious to every beginner. The first thing to check when you are connected to a database instance are the connection properties. Below the result area and above the protocol area you can see four select boxes. The first box is used to turn auto commit on and off. If you turn auto commit on, MaxDB will implicitly issue a commit after every statement. Be careful with auto commit when you delete data or modify SQL objects. There is no way to undo your actions, there is no way to rollback an action.
With the second checkbox you can define the SQL mode that you would like to use. Similar to the MySQL Server, MaxDB supports different SQL modes. The SQL modes define which SQL language variant is accepted.
- INTERNAL: Internal MaxDB definition
- ANSI: ANSI standard in accordance with ANSI X3.135-1992, Entry SQL
- DB2: Definition DB2 Version 4
- ORACLE: Definition ORACLE 7
The SQL Studio checkbox allows you to connect to MaxDB using the SQL modes INTERNAL or ORACLE.
The third checkbox allows you to define the Isolation Level. MaxDB supports all Isolation Levels defined by the ANSI standard. You can choose between: not committed, committed, repeatable and serializable. The meaning of the levels and the phenomena that can occur are explained in the MaxDB manual, see Glossary: Isolation Level. And if you are on MaxDB 7.6.00 you can set the current schema in checkbox on the right (MySQL: CREATE DATABASE = CREATE SCHEMA).
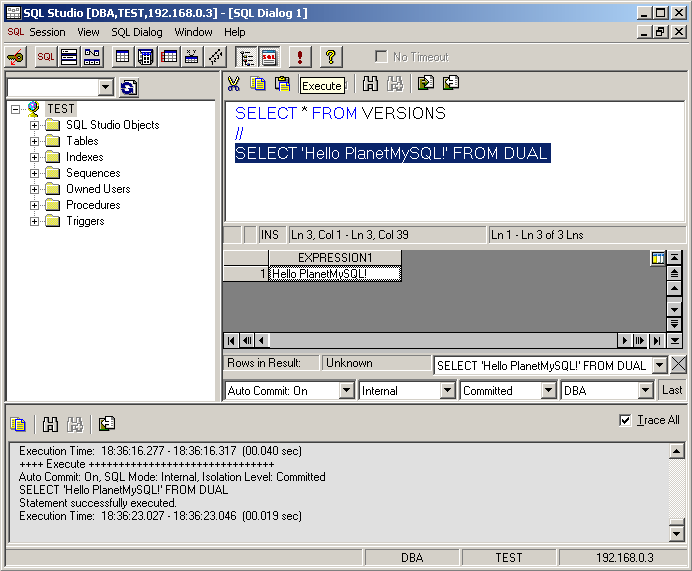
Once you have checked the connection properties you can execute your first query. Do something simple like: SELECT * FROM VERSIONS. The database system contains a series of system tables with information about database objects and their connection to each other, statistics system tables, monitor system tables and loader system tables. When you compare this to MySQL, MaxDB system tables are the same as the tables contained in the INFORMATION SCHEMA of MySQL. To execute the query, move your cursor in the line of the query and press F8. Alternatively you can press the button with the red exclamation mark on it.
If you want to execute multiple statements at once, write it statement in its own line and put one line with two forward slashes ( // ) in between the statements. Double forward slashes in a new line are used to seperate statements from each other and to mark the end of one statement.
Pitfalls, error messages and searchable manual variants
Now comes a common pitfall when you use SQL Studio for the first time. Execute SELECT “Hello PlanetMySQL!” FROM DUAL. Note the double quotes around the string. SQL Studio complains about this statement:
---- Error -------------------------------
Auto Commit: On, SQL Mode: Internal, Isolation Level: Committed
 Column not found;-4005 POS(9) Unknown column name:Hello PlanetMySQL!
SELECT "Hello PlanetMySQL!" FROM DUAL
The error message that appears in the protocol area tells you the reason. If you put a string in double MaxDB interprets it as special identifier. MaxDB distinguishes between simple and special identifiers. An identifier is something like a column name, a table name, or a function name. If you do not enclose an identifier in double quotes, MaxDB will ignore upper and lower case by using the upper case variant of the identifier. That means, that for example the table names Dual, DUal and dUal all refer to the table DUAL. But if you put double quotes around an identifier no conversion is made. That means the table name “Dual”, “DUal” and “dUal” refer to three different tables and none of them refers to the table DUAL. So, in this case MaxDB belives you want to refer to the column “Hello PlanetMySQL!” which does not exist. Use single quotes to solve the problem: SELECT ‘Hello PlanetMySQL!’ FROM DUAL.
++++ Execute +++++++++++++++++++++++++++++++
Auto Commit: On, SQL Mode: Internal, Isolation Level: Committed
SELECT 'Hello PlanetMySQL!' FROM DUAL
Statement successfully executed.
Execution Time:  20:10:06.744 - 20:10:06.763  (00.019 sec)
Whenever you get an error, MaxDB will show you the error code, e.g. -4005. Error codes are devided in certain number ranges. All errors from -4000 to -4999 are database kernel message errors. Error codes and number ranges are documented in the manual. The frontpage of the online manual shows a link “Messages” that you can use to navigate to a list of all error messages, number ranges and explations how to solve the error. Searching the online manual is difficult, but there is a trick to search the manual. Press F1 in the SQL Studio or select SQL Studio Topics in the Help menu. The SQL Studio help contains the entire MaxDB manual. You can search this variant of the manual as easy as the Windows help/HTML help variant of the manual offered for download on http://dev.mysql.com/doc/maxdb/index.html. When you use the SQL Studio help, make sure that the version of the manual does match the version of the database instance you are connected to. If that is not the case, get a copy of the manual version that belongs to your database instance version. The SQL Studio packages is not as often updated as the server packages and the documentation packages. Be warned that the SQL Studio help might be outdated. Nevertheless, it is a good and powerful alternative to the HTML version of the manual.
Summary
Looking back on all articles of the MaxDB series, you should have a working copy of MaxDB. You know how to start and stop it, how to use the administration tools and how to execute SQL queries using the SQL tools. What we left out is the topic of creating automatic startup and shutdown scripts on Unix. On Windows everything is done using services and has been configured automatically. Check the manual (Glossary: Automatic Start) on hints and examples for Unix start scripts.
For you it is time to look back. Use the DBM GUI and the SQL Studio to evaluate if MaxDB has all the features you need. If anything is missing, please use the MaxDB forum to tell us what MaxDB lacks.
In the next issue
In the next issue we will discuss the user concept of MaxDB. Comments are always welcome. Enjoy!
Ulf Wendel for the MySQL MaxDB team